
Buying a CKD refrigerated body kit moves part of the factory into your workshop. Done well, that trade saves freight and import duty and builds local capability; done casually, it produces a box that leaks air, bridges cold and wears out early. This guide walks through what arrives in a kit, the workshop and tools you need, the assembly sequence, and the quality checks that decide whether the finished body holds temperature. It is written as general industry practice — the drawing set supplied with your specific kit always overrides anything written here.
Before You Start: What Arrives in a CKD Kit
Panels, doors, sub-frame, profiles and fasteners
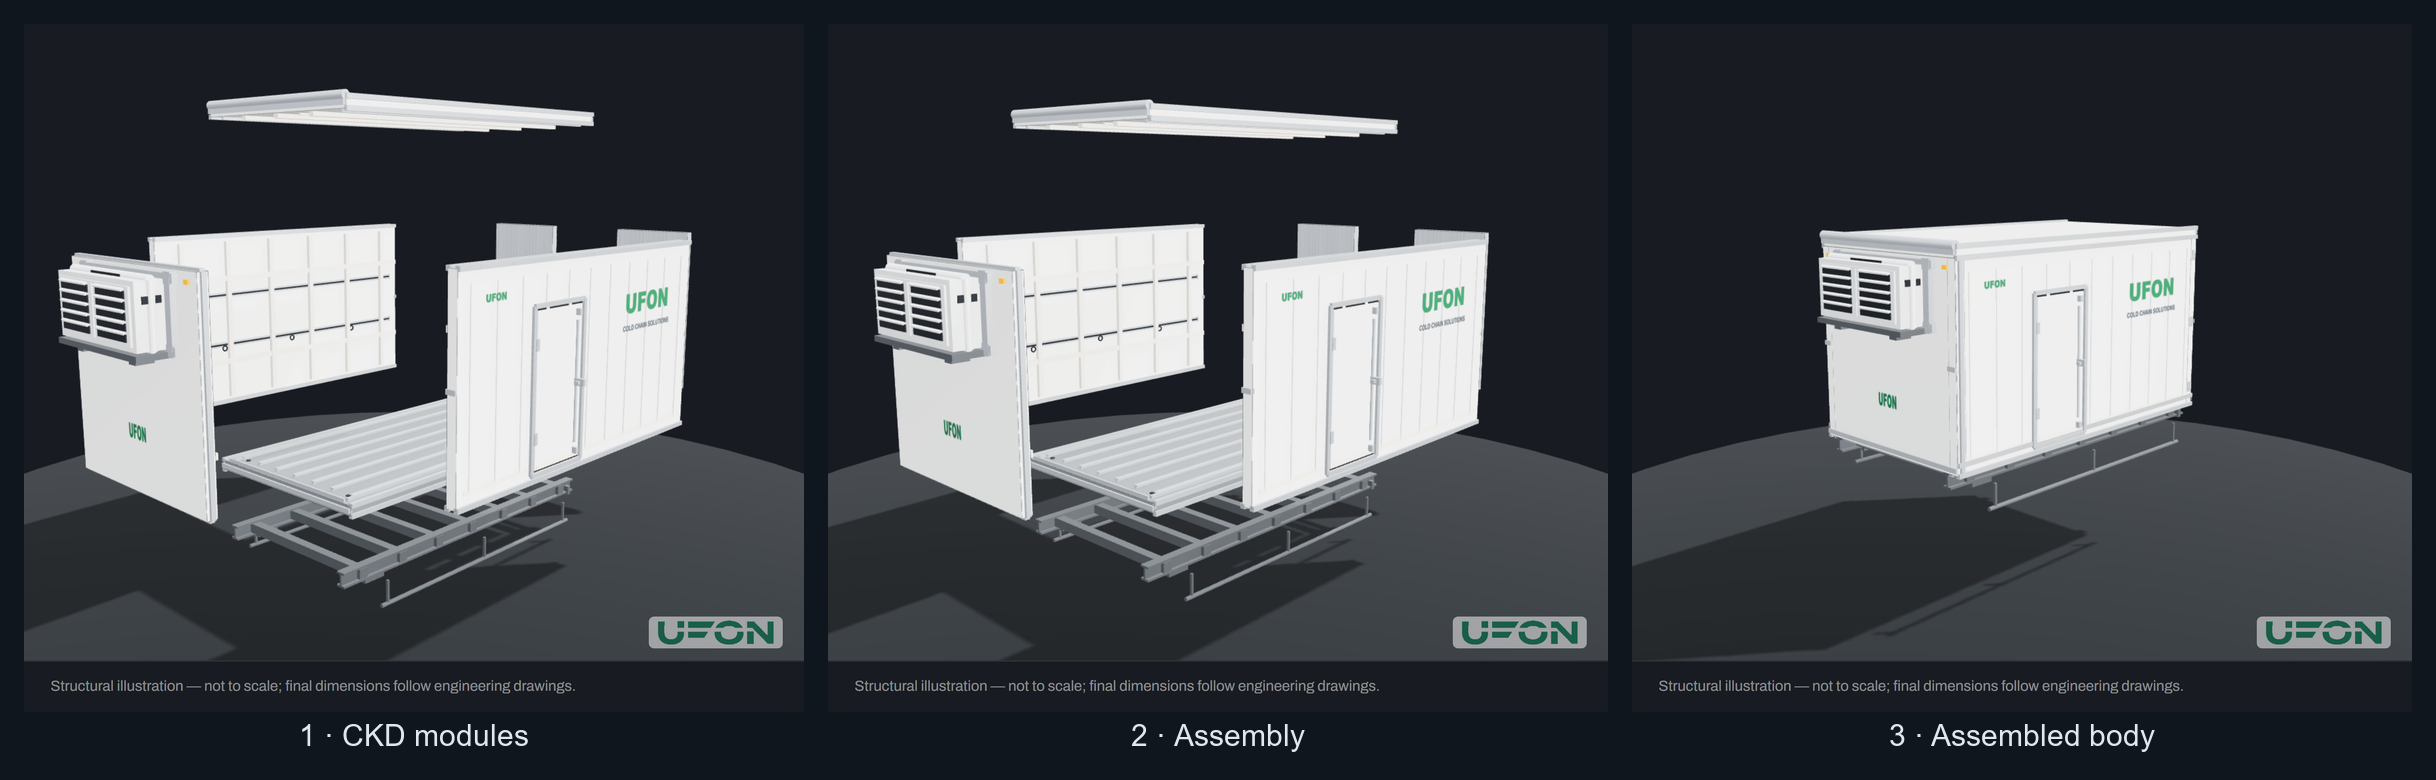
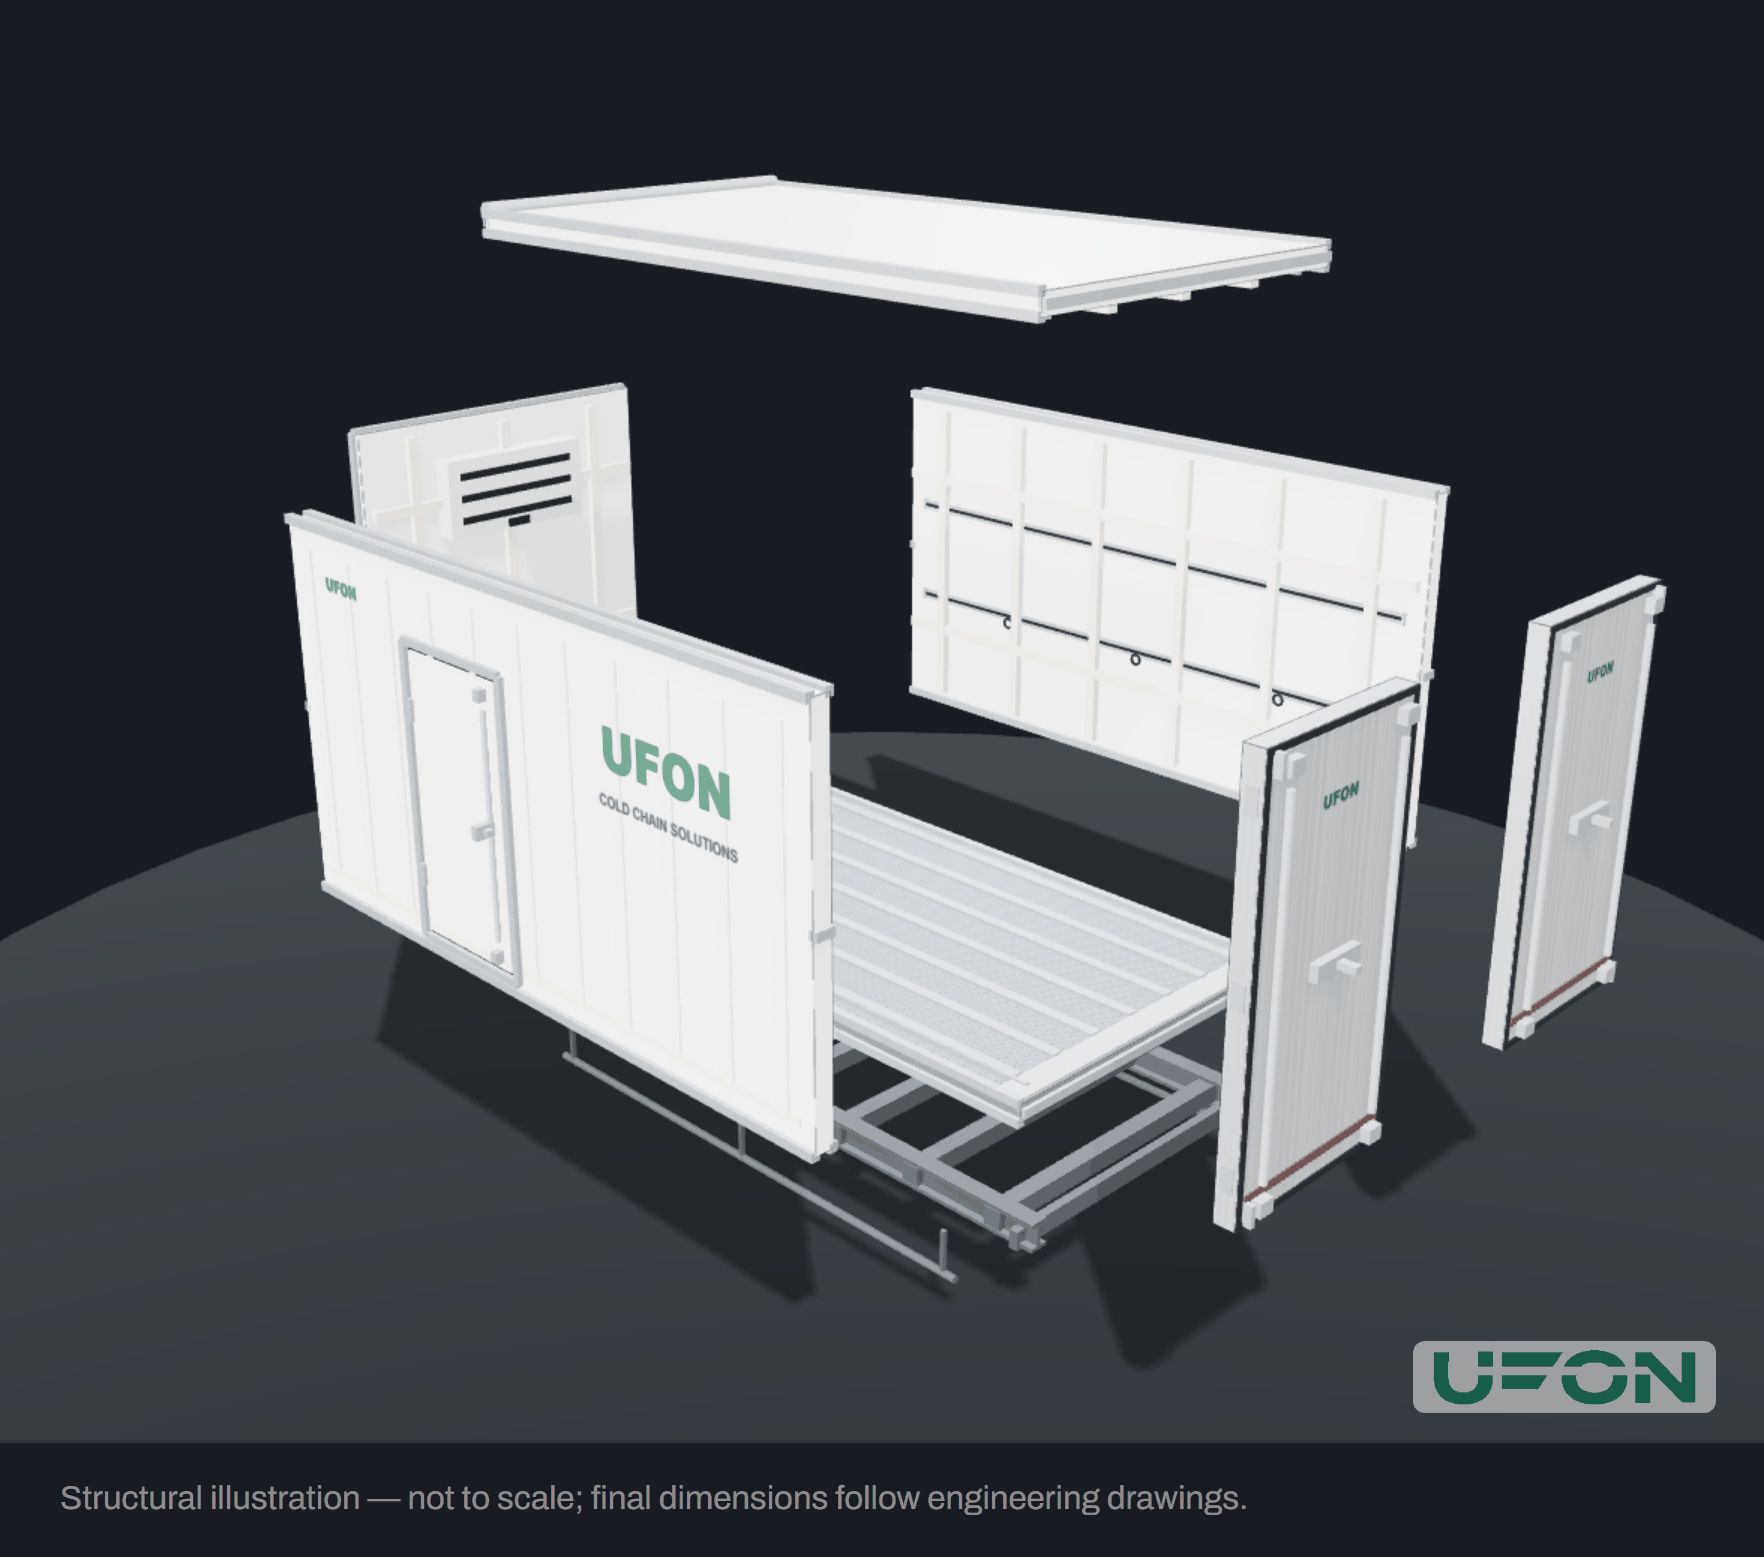
A complete kit contains the insulated sandwich panels — roof, front wall, side walls and floor — plus the rear doors, sub-frame members, corner profiles and extrusions, fasteners, seals, and adhesives where the design specifies bonding. UFON kits follow the same eight-module architecture as our factory-built bodies: roof panel, front wall with the refrigeration-unit mounting structure pre-framed, two side walls with optional embedded E/F cargo track, a floor system with T-shape return-air ducts, two insulated 304 stainless rear doors, and a screw-connected sub-frame. Modular architecture has a practical benefit at this stage: a module damaged in transit can be reordered individually instead of writing off a body.
Drawing sets and part labeling
A kit without drawings is scrap metal and foam. Expect an assembly drawing set with part numbers keyed to labels on every panel and bundle. On delivery day, check the packing list line by line before signing the receipt, photograph the labels, and quarantine anything damaged. Every hour spent on this check saves days of improvisation later — a missing bracket discovered mid-build becomes a local fabrication job with all the tolerance risk that implies.
Workshop, Tools and Team You Need
Tool list
Kit manufacturers publishing their requirements describe a surprisingly ordinary toolkit — the sophistication lives in the kit design, not in exotic equipment. The table below is a generic industry list; your supplier's drawing set defines the actual fasteners and adhesives for your kit.
| Tool | Typical purpose |
|---|---|
| Power drill and bits | Pilot holes and fastener installation |
| Rivet gun | Profile and trim fastening where the design specifies rivets |
| Torque wrench | Sub-frame bolts tightened to specified torque |
| Lifting gear (hoist or forklift) | Panel handling — panels are large even when light |
| Sealant guns and PU adhesive | Continuous bonding and sealing of joints |
| Hand tools (wrenches, mallets, squares, levels) | Alignment, clamping and general assembly |
Floor space and handling requirements
You need flat, clean, dry indoor floor space longer and wider than the finished body, with room to walk around all four sides. Store panels flat, protected from moisture and direct sun, and plan lifting points before you start — sandwich panels are light for their size but awkward, and a dropped corner can ruin a panel. Two people per large panel is the practical minimum.
Skill level: what semi-skilled crews can and cannot do
Kit suppliers consistently report that semi-skilled crews can assemble complete bodies from well-designed kits, and that on highly pre-assembled kits a skilled worker can complete roughly one body per day. Treat your first build as a training build: go slower, add checks, and document the questions that arise — the answers become your local work instructions for every kit after it.
Assembly Sequence
Sequences vary by kit design, but the logic is constant: build from the bottom up, establish the structure before closing it in, and never seal a joint you have not yet aligned. A typical sequence for a modular kit:
Step 1 — Sub-frame and floor system on the chassis
Position the sub-frame on the chassis and bolt the mounting brackets to the specified torque — this connection carries the whole body, so use the torque wrench, not judgment. Lay the floor system with the T-shape air ducts oriented along the airflow direction, drain ports at the front, and check level and square before anything goes vertical.
Step 2 — Front wall and side panels
Set the front wall first — and check its orientation twice, because the refrigeration-unit mounting frame and fixing ears only work one way — then the side walls. Fit corner profiles as you go, brace temporarily, and measure the diagonals of the box before committing any joint: a body that starts out of square will fight you at the roof and doors.
Step 3 — Roof panel and corner profiles
Lift the roof panel on with the nose fairing facing forward, seat it on the wall tops, and complete the corner profiles. This is the joint line most exposed to weather, so follow the bonding and sealing specification exactly, and re-check the diagonals while the adhesive can still be adjusted.
Step 4 — Rear doors, locks and seals
Hang the rear doors on their hinges and adjust until the perimeter seals compress evenly all around — the doors should close with firm, uniform resistance and show no light gap from inside. Fit the lock rods and cam locks, synchronize the pair at the center seam, and finish the threshold plate.
Step 5 — Refrigeration unit mounting and final sealing
Mount the condenser and evaporator per the unit maker's own manual — that document governs the refrigeration installation, not this guide. Then walk the entire body inside and out and seal every penetration and joint line. A continuous, inspected sealant bead is the cheapest insulation you will ever buy.
Bonding, Fastening and Cold-Bridge Control
Adhesive-bonded vs riveted vs bolted joints
Modern composite bodies increasingly use adhesive bonding — high-strength polyurethane adhesives formulated to resist vibration and humidity — because a bonded joint seals continuously and avoids the through-panel holes that leak air, water and heat. Riveting remains common in traditional sheet construction: fast and simple, but every hole is a potential leak and corrosion path. Bolting is reserved for joints that must come apart — which is why UFON sub-frames are screw-connected, so CKD kits assemble with hand tools and individual modules stay serviceable.
| Dimension | Adhesive bonding | Riveting | Bolting |
|---|---|---|---|
| Sealing | Continuous seal along the joint | Holes can leak if not sealed | Depends on gasket and washer design |
| Cold-bridge risk | Lowest — no metal through-path | Metal fasteners bridge the wall | Localized at each fastener |
| Tooling | Sealant gun plus curing conditions | Rivet gun | Torque wrench |
| Serviceability | Poor — joints are permanent | Poor | Good — disassembles and retorques |
| Typical use | Composite panel joints (industry mainstream) | Traditional sheet construction, trim | Sub-frame, brackets, serviceable joints |
Where thermal bridges hide: corners, door frames, floor rails
A thermal bridge is any path that lets heat skip the insulation: metal profiles passing through a wall, compressed insulation at corners, door frames, floor rails and sub-frame contact points. Industry analysis puts the assembled-body penalty at 15–25% worse thermal performance than the flat-panel figure — most of it concentrated at exactly these locations. Follow the kit's corner and frame details precisely, avoid improvised holes through panels, and verify with an infrared thermometer after the pull-down test if you have one.
Quality Checks Before First Load
Door seal and alignment checks
Close each door on a strip of paper at a dozen points around the perimeter — the strip should grip everywhere. In a dark workshop, look for light gaps from inside. Check latch effort, hinge play, and that drain ports are clear. Doors are the largest moving seam on the body, and the most common source of callbacks.
Temperature pull-down test
Before the first cargo, run the refrigeration unit with the doors closed and time how long the empty box takes to reach setpoint, comparing against the unit maker's expectation for the box volume. A body that cannot pull down — or that warms quickly once the unit cycles off — is telling you about a sealing or thermal-bridge problem. Find it now, not after a rejected load.
Common Assembly Mistakes (and How the Kit Design Prevents Them)
The failures repeat across the industry: skipping the packing-list check and discovering missing parts mid-build; over-torquing sub-frame bolts; leaving sealing 'for later' and never coming back to it; installing the front wall backwards; ignoring adhesive cure times and loading joints early; and drilling improvised holes through panels for cargo fittings, creating leaks and cold bridges in one move. Modular kits with labeled parts and drawing sets exist precisely to remove these failure modes. If your kit arrives without labels or drawings, stop and ask the supplier before assembling — that request is reasonable, and the answer tells you a lot about who you bought from.
What UFON Provides With Every Kit
Every UFON CKD kit ships flat-packed with a full drawing set, organized around the eight-module architecture: roof panel, front wall with pre-framed refrigeration-unit mounting, side walls with optional embedded E/F track, a floor system with T-shape return-air ducts and stainless threshold, insulated 304 stainless rear doors with cam-lock rods, and a screw-connected sub-frame in high-strength aluminum or SS400/Q325 steel. If you want assembly measured in hours rather than days, the same body is available as SKD with major assemblies pre-built. Questions during assembly go through the same channel as your inquiry — send photos, and our engineers will work through them with you.
FAQ
How long does it take to assemble a refrigerated truck body kit?
Published figures range from about 1.5 labor-hours for a highly pre-assembled kit to 20–40 hours for a fully knocked-down body, and kit suppliers describe semi-skilled crews completing a modular body in one to a few days. The deciding variable is the degree of pre-assembly — ask every supplier to state it explicitly, because it moves the answer by an order of magnitude.
What tools do I need to assemble a CKD reefer kit?
Industry-published lists are ordinary workshop tools: power drill, rivet gun, torque wrench, lifting gear for panels, sealant guns with the specified adhesive, and general hand tools. The sophistication is in the kit, not the toolkit. Your supplier's drawing set defines the actual fasteners and adhesives — follow it rather than a generic list.
Can unskilled workers assemble a truck body kit?
Kit manufacturers report that semi-skilled crews can assemble complete bodies from well-designed, well-documented kits, with skilled workers reaching roughly one body per day on highly pre-assembled kits. Plan your first build as a training build with extra checks, and leave the refrigeration unit itself to the unit maker's manual.
Do suppliers provide assembly instructions and drawings?
They should — a kit without a drawing set is not a product. UFON CKD kits ship with a full drawing set keyed to labeled modules, and industry practice adds assembly videos and, from some suppliers, on-site guidance. Confirm the documentation package before you order, not after the container arrives.
How do you avoid cold bridges during assembly?
Follow the kit's corner, door-frame and floor-rail details exactly — those are the locations where bridges concentrate; prefer bonded joints over through-panel fasteners where the design allows; never drill improvised holes; and verify the finished body with a pull-down test, plus an infrared thermometer pass if you have one.
Sources & scope
These sources were reopened and checked on 2026-11-12. Third-party figures are industry references, not UFON test results; project decisions require confirmed drawings, datasheets and destination-specific requirements.
- Sub Zero — CKD reefer kitsTypical tools, assembly documents and workshop-time context; not a UFON assembly-time commitment. Accessed 2026-11-12.
- Composite Box — Refrigerated truck body manufacturing processBase-panel-first sequence, bonding discussion and pre-delivery checks; UFON work follows approved drawings. Accessed 2026-11-12.
- Bullex — Refrigerated truck body kit assembly supportOne supplier’s instruction-video and highly pre-assembled kit example; not a universal assembly-time value. Accessed 2026-11-12.
- HOTECH Engineering Team — Whole-body thermal bridgesIndicative 15–25% assembled-body penalty versus flat-panel calculation; third-party engineering analysis, not a UFON test result. Accessed 2026-11-12.